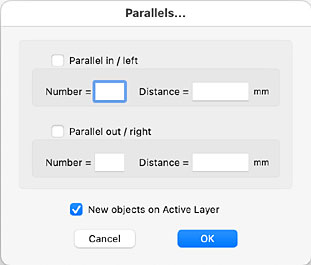
 Parallels...
This pallet now forms part of the Parallel Tool in the Windows >> Tools pallet, where both static parallels (like this pallet) and dynamic parallels can be set (by double-clicking the tool).
There is a full discussion of both the static and dynamic parallels functions in the Windows >> Tools section
It is recommended that although this pallet still works, the parallels function is used from the Tools pallet, not from this "Action" pallet.
Hatches... (keyboard shortcut ⌃⌘H)Brings up the pane below right which allows you to apply any of the 20 different hatches to a selected object. The hatch which is selected (top left in this case) is indicated by being reversed – a black background and white lines instead of the usual white background with black lines.
Hatches can be edited at this point. The difference is that editing them here is a one-time edit; your edits are not saved for future use. There is a full discussion of the editable parameters in the Edit >> Hatches menu. Briefly, the parameters are:
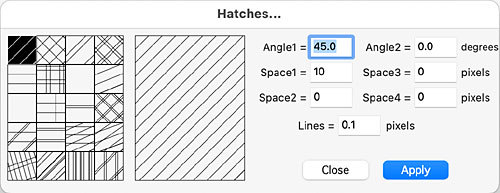
Angle1: The angle of the first set of lines making up the hatch.
Space1: The distance between the first set of lines.
Space2: Adds an optional second set of lines this distance from the first set.
Angle2: The angle of an optional set of lines at a different angle from the first set.
Space3: The distance between the first set of Angle2 lines.
Space4: Adds a second set of lines this distance from the first set of Angle2 lines.
Lines: The line weight.
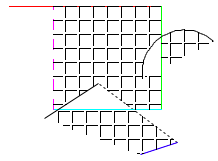
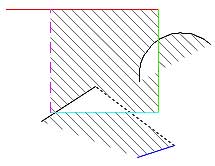 Hatch is quite versatile as can be seen from the image to the right. This hatch was created by one-time editing the Angle to be 135º and Space1 to be 7 pixels. Shapes to be hatched do not have to be single objects (oval, rectangle, polygon). Two of the shapes in the image to the right are made by individual bounding lines, joined at their end points (using Snap). The red line at the top is also extended to the left and RealCADD ignores that. If more than one of the lines were extended, RealCADD would take notice of that and you would get a different arrangement of the hatch. RealCADD also interprets overlapping shapes as can be seen, and is happy hatching open shapes as well as closed ones.
A hatch is an editable object after the hatch is done. You can change the colour, weight and dash pattern of the lines in the Attributes pallet; and you can flip it or rotate it. You can also move it to the back (⌥⌘B), which can make it easier to select the bounding lines if you wish to.
Tip: The bounding lines of a hatch can be deleted after the hatch is done – sometimes it is quicker and easier to draw a polygon (using Snap) over a series of complex lines/shapes, hatch the polygon, and then delete it.
Tip: A hatch can also be broken down into its constituent lines by using Action >> Convert to lines (⌥⌘L). In this way you can adjust a complex hatch if necessary after you have done it. If you just need to crop the ends off a few lines, break it down (⌥⌘L) and immediately group the constituent lines. You can then use the cutting tool to chop off the bits that you don't want. If it is a more complex adjustment, then after breaking the hatch down to lines, hold the shift key down and click the lines you want to work on (to deselect them) and then group the remainder. After you're done you can re-group the whole hatch if you wish.
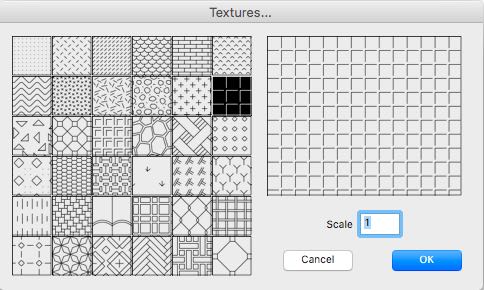 Textures... (keyboard shortcut ⌃⌘T)
Brings up the pane to the right which allows you to apply any of the 36 different textures to a selected object. You can edit the textures to your specific requirements in the Edit >> Textures menu. Unlike hatches, textures can't be one-time edited from here.
The currently selected texture has a black background and white lines – the sixth from the left, second row in this case.
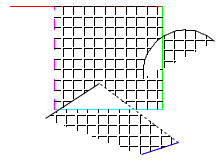
 Here's the same set of lines and shapes as we used with Hatches above, only this time we have applied the selected texture.
A texture can be manipulated, converted to lines, etc., in the same way as described for Hatches above.
And once a texture is created, the bounding lines can be deleted if wished.
 In addition, textures can be applied bigger or smaller using the Scale box, so they are more appropriate to the size of the objects.
In the image to the left, the same texture has been applied at .75 of its full size (enter 0.75 in the Scale box).
Tip: The Action menu can also be accessed directly on the screen: select an object or objects and right-click or ⌃-left-click (control-left-click).