ClarisCAD was probably the most popular 2D CAD program for the Mac. Development of the program sadly ceased suddenly some 30 years ago – but even now there is a small body of users – and many more who have legacy ClarisCAD drawings.
Up until OSX 10.4, ClarisCAD would run in the "Classic Environment", which allowed OS9 programs to run on PowerPC-based Mac computers, running System OSX (but not on Intel based machines). As of OSX 10.5, Classic was no longer available.
ClarisCAD can however be run on intel machines, using Sheepshaver OS-9 emulation.
While RealCADD can't open ClarisCAD files directly, there is a path to getting legacy ClarisCAD drawings into RealCADD, albeit not perfectly.
To do this you need a copy of Claris Graphic Translator – which is included in the ClarisCad 2.0v3 disc set.
As mentioned above to run ClarisCAD (and the Graphics Translator) you either need a Power PC Mac running System 10.4 or earlier with Classic Environment enabled, or a Power PC mac (or earlier) running system OS8 or OS9, or an intel Mac with Sheepshaver emulation. Sheepshaver runs just fine on macOS 10.9 (Mavericks) through macOS 11 (Big Sur).
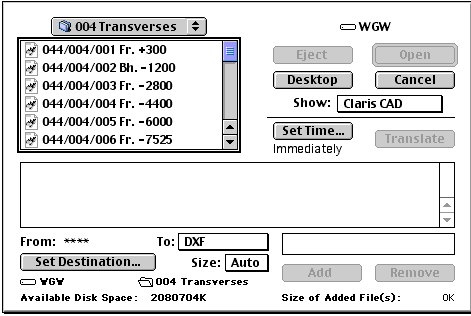
 Assuming that you have Claris Graphics Translator running, select File >> Translate... (keyboard shortcut ⌘T) from the top menu, which will load the translate window to the right.
First of all set the "To:" box to "DXF". It defaults to ClarisCAD, which means that you can't translate from ClarisCAD
Next, set the "Show:" box to "ClarisCAD" – you can leave it at "All available" if you wish, but it's less confusing just to show ClarisCAD files.
Navigate to where the ClarisCAD file that you want to translate is located, using the drop-down menu box, top left.
Select the file with a single click, at which point the "Add" button will become active. Hit the "Add" button and the file will be added to the central Translate part of the window. You can add more files to translate if you wish.
Basically you are now ready to translate the ClarisCAD file(s) to DXF. By default the DXF file will go to the same destination as the original ClarisCAD file. You can set a new destination using the "Set Destination" button – but I have found that it only works on a second translation – the first will go to the default destination.
Hit the "Translate" button and the ClarisCAD file(s) will be translated to DXF format – a progress bar appears, showing how it is going and then, when it is done, a message indicating that there are no more files to translate.
Open the translated file in RealCADD in the usual way – see File >> Open
There are some oddities of scale. Regardless of what units the original drawing was drawn in, Translator appears to translate in inches. So if your original drawing was metric you will need to resize the new drawing (including text) by a factor of 25.4, 2.54, .254 etc. depending on the scale of the original. So for a 1:10 drawing you would resize everything by 0.254 for example.
Other than that the results are quite good, recognizing that ClarisCAD was not nearly as accurate as RealCADD. Text and arrows will be a bit odd. And any background colours that you have in ClarisCAD may be translated as Black. Hatches will also be a group of lines rather than a true hatch. But in general the result is usually quite usable with a bit of tweaking.
