Initially RealCADD will open with a new Plan – "Untitled 1" – which will be displayed at the bottom of the Window menu. As more drawings are opened, they will add to the list. To move from one to another, simply click the one you want. The current drawing will be ticked.
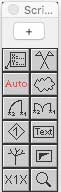 The Scripts pallet allows RealCADD users to write RealBasic scripts to perform specialist functions that are not part of the standard program.
RealCADD comes with a set of demo scripts. It is currently beyond the scope of this manual to discuss creating scripts in any depth – I simply do not have sufficient knowledge of Real Basic. There is more information in the "Read-me Scripts" in the Scripts folder in the RealCADD application folder. There is however a discussion of the Autosize custom script if you scroll down.
To activate a script, simply click its icon on the Scripts pallet. This will bring up a window (which varies according to the script) requiring some data. Fill in the data as necessary and hit the OK button. Click on the screen and drag: the script will run and perform its function. To exit, hit the ⎋ (Esc) key.
If you wish to see what a script looks like and/or edit it, ⌥-click (option-click) the script icon and the script edit panel will come up. Unless you are proficient in RealBasic (now XOXO) it's best to make a copy of the code before you start to mess with it!
The pallet shown on the right has two custom scripts that are not part of the standard demo scripts, so you won't see them on your copy of RealCADD. They are:
 Autosize. Draws a dimension line with the dimension text in the centre of the dimension line (not above or below). I find this very useful in complex, often crowded, drawings with a lot dimensions when RealCADD's standard dimensioning tools have difficulty. And in any case, I like my dimension text in the centre of the dimension line, which is currently not active in RealCADD.
 Zoom special. Allows the user to specify a custom zoom, rather than the standard zooms, or zooms produced with the zoom tool. E.g. you can specify a zoom of, say, 150%. This is very useful if you are wanting to take screen shots to turn RealCADD drawings into images, which can produce better images than saving them directly as jpeg's. It is equally useful when saving directly as jpeg's from within RealCADD as the zoom is a factor in the quality of the final image – and this give the ability to repeatedly produce an exact zoom.
Below is a discussion of the code for Autosize – which may be of assistance for would-be coders to write their own scripts.
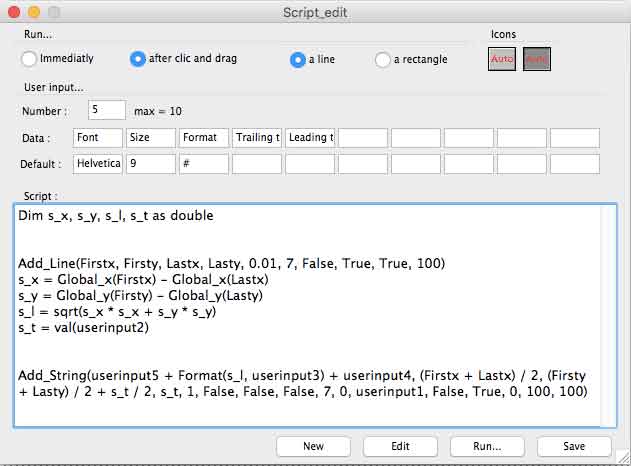 To start a new script, hit the + icon at the top of the scripts pallet, which will bring up the Script-edit window, which will be like the Autosize code window shown here, but blank.
Run ...
Immediately. The script starts immediately upon clicking its icon
After click and drag. The script starts after clicking on the drawing – this records the x and y positions of the click. Select this for the Autosize script.
Line or Rectangle. For Autosize we want to draw a line.
Icons. Two icons are provided (an "Up" icon and a "Down" icon). These can be modified as you wish – you will find two blank icons in your Scripts folder. After you have created your specific icons, store them in the Scripts folder. Then click one of the provided icons, navigate to the Scripts folder and select your icon; hit the Choose button. Repeat with the other icon. Note that icons are 24 pixels high by 28 pixels wide in bitmap (.bmp) format. Here we are seeing the icons that I created for this script.
User input ...
Number: This is the number of data items that you wish to enter. Enter 5 for the Autosize script.
Data: These are the data items themselves. They will be editable on the script window. For the Autosize script enter: Font Size Format Trailing text Leading text – in that order. The order controls the order they appear on the script window.
Default: These are the default values you want for the data. We set the first three in the Autosize script to Helvetica 9 #. This will set the font for the dimension to Helvetica size 9 point with no decimal places. If we want 1 decimal place as the default, we would enter #.# in the Format default, and so on. We don't want a default for "Leading text" and "Trailing text". If you wanted the unit to follow the dimension text you could make a default for Trailing text of mm. Or you can add another user input Unit and give that a default of mm.
The script code
Dim s_x, s_y, s_l, s_t as double
A "Dim" statement defines the variables and must come first in the code. Here we are defining the variables "s_x", "s_y", "s_l" and "s_t" as "double", which in RealBasic (XOXO) is a decimal number.
Add_Line(Firstx, Firsty, Lastx, Lasty, 0.01, 7, False, True, True, 100)
Here we are instructing the code to execute a "Sub" statement: Add_Line(). For a list of the available Subs, refer to the Scripts Read-me. Then we define the Sub parts within the parentheses, each separated by a comma:
Firsty – the y-position of the first click
Lastx – the x-position of the second click
Lasty – the y-position of the second click
0.1 – LineSize: the thickness of the line
7 – CLine: the color of the line (0=white, 1=red, 2=yellow ... 7=black)
False – Lselected: not used in Add_Line; can be True or False
True – ArrowLeft: True - we want an arrow on the left end of the line
True – ArrowRight: True - we want an arrow on the right end of the line
100 – the opaqueness of the line; 100 = 100% opaque, not transparent at all
s_x = Global_x(Firstx) - Global_x(Lastx)
Defines the variable s_x as Firstx - Lastx – the distance we have travelled in the x-direction. Global is an identifier that makes sure that the function is available everywhere in the coding.
s_x = Global_y(Firsty) - Global_y(Lasty)
Defines the variable s_y as Firsty - Lasty – the distance we have travelled in the y-direction. Global is an identifier that makes sure that the function is available everywhere in the coding.
s_l = sqrt(s_x * s_x + s_y * s_y)
Calculates the actual length of the dimension line using Pythagoras' Theorem for a Right Triangle (square on the hypoteneuse equals the sum of the squares on the other two sides). s_l is the hypotenuse of the Right Triangle, the other two sides of which are s_x and s_y. So:
s_t = val(userinput2)
Defines s_t as the value of userinput2 (the font size).
Add_String(userinput5 + Format(s_l, userinput3) + userinput4, (Firstx + Lastx) / 2, (Firsty + Lasty) / 2 + s_t / 2, s_t, 1, False, False, False, 7, 0, userinput1, False, True, 0, 100, 100)
The assembly and positioning of the dimension text, using the Sub Add–String. We will look at each part individually:
userinput5 + Format(s_l, userinput3) + userinput4
This says display userinput5 (Leading text). Then display s_l (the length of the line), formatted according to userinput3 (the number of decimal places. Then display userinput4 (Trailing text). Mostly userinput5 and userinput4 will be empty, so basically this displays the dimension text.
(Firstx + Lastx) / 2
The average of Firstx and Lastx will be the centre of the dimension line in the x-direction, which is where the dimension text needs to go.
(Firsty + Lasty) / 2 + s_t / 2
Similarly this establishes the centre of the dimension line in the y-direction. To this we add half the font size (s_t) to get the location of the bottom of the dimension text.
s_t
Denotes the font size for the dimension text
1
Controls the alignment of the dimension text: 0=left; 1=centre; 2=right. We want our text in the centre.
False
isBold we don't want bold text – hence False
False
isItalic we don't want italic text – hence False
False
isUnderline we don't want underlined text – hence False
7
Controls the colour of the dimension text: 0=white, 1=red, 2=yellow ... 7=black. We want black text.
0
CFond is the background colour (of the dimension text) if "Filled" is true. 0=white, which is what we want.
userinput1
Font as denoted by userinput1.
False
LSelected not applicable - can be True or False.
True
Filled we do want a background colour to the dimension text, so True.
0
LRotAngle The dimension text is not rotated (0º).
100
The opacity of the dimension text colour; 100 = 100% opaque.
100
The opacity of the dimension text background colour; 100 = 100% opaque.
That's it! Hit Run to test the code. Hit Save to save it. Save it in the Scripts folder within the RealCADD application folder. Your new script will appear in the Scripts pallet.
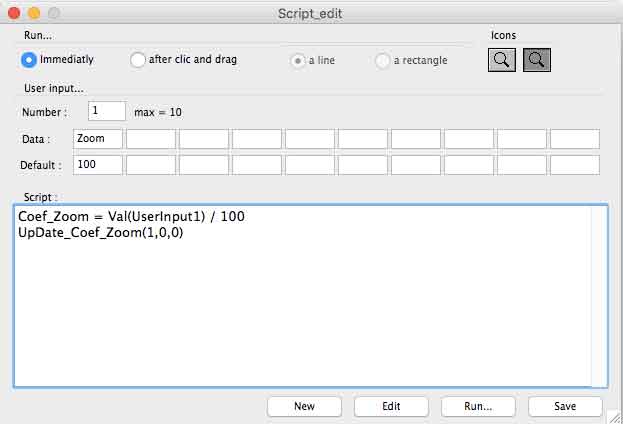 Here is the code window for the Zoom Special script
Experiment for yourself…