Initially RealCADD will open with a new Plan – "Untitled 1" – which will be displayed at the bottom of the Window menu. As more drawings are opened, they will add to the list. To move from one to another, simply click the one you want. The current drawing will be ticked.
Enhanced Snap is enabled by checking "Display attraction names" in the RealCADD >> Preferences >> Display section; it can also be toggled on and off using the small screen menu bottom left on a RealCADD drawing.
Standard Snap

 The Snap pallet is shown to the right, both fully open and retracted. Snap controls the attraction or snap of one object to another, both while you are drawing and while an object is being moved.
In the image, Snaps Endpoint, Center, Intersection and Perpendicular are selected; Grid and Tangent are not selected. This shows in the full pallet and the retracted pallet.
Active snaps are shown in the full pallet by the darker grey background to the icons; in the retracted pallet they are shown by their keyboard shortcut.
Here are the available snaps:
Grid: Keyboard shortcut G. Snaps to the grid, as set up in Preferences.
Endpoint: Keyboard shortcut E. Snaps to the endpoint of a line, or line making up an object.
Center: Keyboard shortcut C. Snaps to the centre of a line, or a line making up an object, or the centre of a rectangle, an ellipse or circle, or an arc.
Intersection: Keyboard shortcut I. Snaps to the intersection of any lines or objects. Also enables Surface snap  and
and  .
.
Perpendicular: Keyboard shortcut P. Only works when drawing. Snaps to a line or object to indicate that a perpendicular can be drawn.
Tangent: Keyboard shortcut T. Only works when drawing. Snaps to a circle or circular arc to indicate that a tangent can be drawn.
The great thing about snaps is that they can be enabled and disabled "on the fly" as you draw. So for example, suppose you want to draw a line from the endpoint of an object to the centre of an object. Select the Line tool. Hit E and hover over the endpoint of the first object until the draw cursor changes to indicate that it has found the endpoint. Draw the line by dragging as usual. Hit C as you get near the second object and drag until the cursor indicates that you have found a centre. Click to complete the line. If you need to, after you have found the endpoint and started to draw the line, you can disable the endpoint snap by hitting E again, either before or after you hit C to find a centre.
In practice for most drawings where you are not snapping to the grid, you will find that you can leave E, C, I and P enabled most of the time. I remember this by the mnemonic EPIC (which works in English), even though the order is not quite the same. Only when the drawing starts to get very complex with lots of lines and objects in close proximity, will you need to disable some of those four main snaps, so that you get the snap you want.
Tip: Snap generally finds the snap preferentially on the most recently drawn object. Regardless of this, there does seem to be a slight "pecking order" with snaps, whereby Intersection is less favoured than Endpoint, Centre and Perpendicular. So, if you have trouble snapping to an intersection, just disable the others.
Tip: Tangent snap will only work from a circle or arc. It will not generally work while Perpendicular is enabled – so disable Perpendicular before trying to draw a tangent. You can draw a tangent from one circle or arc, to another enabling you to make the typical "bicycle chain" construct.
Special Perpendicular
New to version 4.80 is the ability to draw a perpendicular line from an end point, a centre point or an intersection.
To activate this select the line tool, move the cursor along the object you want to snap from until the perpendicular cursor  shows. Hit ⌥└┘ (Option - Space bar) to lock in the perpendicular function. The move the cursor to an end point, a centre point or an intersection (so
  ,
,  , or
, or  show) and draw the line. It will draw perpendicular to the original object, from the point selected.
Enhanced Snap – Select Cursor

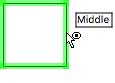
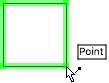
 With Enhanced Snap enabled, objects are highlighted in green as the Select Cursor finds them.
The first image to the right shows a square simply highlighted – the Select Cursor hasn't found an endpoint or a centre.
The second image shows a square highlighted where the Select Cursor has found an endpoint (Point) – in this case a corner.
The third image shows a square highlighted where the Select Cursor has found the centre (Middle) of one of the sides.
The fourth image shows a square highlighted where the Select Cursor has found the geometric centre (Center) of the whole square.
With drawn objects, in addition to just highlighting the object, the Select Cursors finds the following:
Line: Point and Middle.
Rectangle & Square: Point and Middle of the lines forming the sides; Center of the object.
Rounded Rectangle: Point of lines forming the sides (where they finish and the corner radii start), and Middle of those lines; Center of the object.
Oval & Circle: Center of the object.
Circular Arc & Elliptical Arc: Ends of the arc (Point).
Regular Polygon: Points and Middles of the sides of the polygon and the Center of the polygon as a whole.
Irregular Polygon: Points (the nodes) and Middles of the line segments of the polygon and the geometric Center of the polygon as a whole, if it has one.
Spline: Points (the nodes).
Enhanced Snap – Draw Cursor
The Draw Cursor acts in the same way as the Select Cursor, finding, and drawing from, Points, Middles and Centers, while highlighting the object to be drawn from. The Draw Cursor snap location names and indicators are the same as for the Select Cursor Point, Middle and Center shown above.

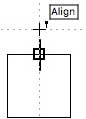
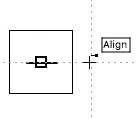 Additionally, the Draw Cursor can draw from a location removed from an object but aligned with a Point, Middle or Center. The three images here show:
First image: Draw Cursor aligned horizontally with the geometric centre (Center) of a square.
Second image: Draw Cursor aligned vertically with the centre (Middle) of one of the sides of a square.
Third image: Draw Cursor aligned both vertically and horizontally with the endpoints (Point) of two lines.
The object to be drawn – it can be any of the Tool objects (Line, Rectangle, Oval, Arc, Polygon, Spline) – will start to draw from the cursor position aligned as indicated.