Convert to lines (keyboard shortcut ⌥⌘L)
Select any object – Circle, Oval, Rectangle, Rounded Rectangle, Arc, Ellipse, Polygon, Bézier, or Spline – and hit ⌥⌘L. This will convert the object into lines, which you can work on, manipulate etc., as you would any other line.
Ovals, arcs, béziers and splines convert to polylines (a large number of very short lines joined end to end – in fact simply a polygon with a very large number of sides).
Rectangles and polygons convert to their constituent lines. Rounded Rectangles convert to four lines making up the sides and polylines making up the radiused corners.
Tip: When working with imported objects via DXF, sometimes what appears to be a line can in fact not be a line but rather a "single-sided polygon" (a contradiction in terms of course!). You find that you can't manipulate it like you would a normal line – you can't cut it and so on. Try "Convert to lines" – this often fixes the problem. Your "line" may turn out to be lots of short lines joined end to end in a straight line; or it may often turn out to be simply a single line, encoded as a polygon.
Convert to polygon (keyboard shortcut ⌥⌘P)This command works in several ways.
Firstly it will convert any set of lines that are selected, and joined end-point to end-point, into a polygon, the sides of which will be the original individual lines. The lines can be selected by selecting one of them then using "Select joined lines" (⌘J) to select all the lines which can be joined (that is their end points are coincident). Or the lines can be selected by using the standard Select tool, or the Lasso tool. Once the lines are selected hitting ⌥⌘P will convert the selected lines into a polygon. The points of the new polygon will be the coincident end points of the original lines.
Tip: Only lines whose end points are coincident can be converted into a polygon. Coincident end points will occur when Snap "E" is used, when lines are trimmed using Cut and extend (U) tool, or "Cut lines with lines ..." in the Action menu. With the latter two options, all extraneous pieces of the cut lines must be removed; if your polygon doesn't form as expected check that there are no small pieces of cut line remaining.
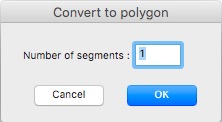 Secondly it will convert a simple line into a polygon. Select the line to be converted and hit ⌥⌘P. In the "Convert to polygon" window, shown right, enter the number of segments requires and hit OK. The points of the new polygon will initially be in a straight line, but can be dragged to new positions as required.
Thirdly it will convert any object (Circle, Oval, Arc, Ellipse, Rectangle, Rounded Rectangle and Spline) into a polygon in the same way that "Convert to lines" converts those object to a set of individual lines.
Tip: If you have previously used "Convert to lines" on an object, this won't convert it back to what it was. A circle, for example, converted to lines and then converted to a polygon, won't be a circle again – it will me a many-sided polygon that pretty much looks like a circle. And a rectangle will be a four-sided polygon – which is a subtly different beast: you can drag any of the corners of a four-sided polygon, whereas you can't with a rectangle.
Convert to spline (keyboard shortcut ⌥⌘S)This command converts selected objects to splines. It works in a similar way to "Convert to polygon" but with some important differences. It has two principal modes:
Firstly converting a polygon 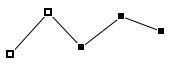 into a spline
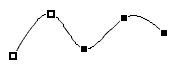
Select the polygon and hit ⌥⌘S. The nodes of the spline will be the same as the nodes of the polygon and can be dragged to new positions, though now on a smooth curve, in the same way.
Tip: If you convert a polygon to a spline and then subsequently convert it back to a polygon, you won't get the original polygon back unfortunately. You will get a polygon with a large number of very small sides and a very large number of nodes.
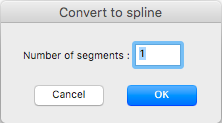 Secondly converting a straight line to a spline. Select the line to be converted and hit ⌥⌘S. In the "Convert to spline" window, shown right, enter the number of segments requires and hit OK. The points of the new spline will initially be in a straight line, but can be dragged to new positions on a smooth curve as required.
Unlike "Convert to polygon", Circles, Ovals, Arcs, Ellipses, Rectangles and Rounded Rectangles, can't be converted to splines. They can of course be converted to polygons and the subsequent polygons converted to splines but that isn't generally a very useful thing to do!
And also unlike "Convert to polygon" a series of joined straight lines won't convert directly to a spline. Selecting the lines brings up the "Convert to spline" window to specify the number of segments but the result will be a set of individual splines (with the number of segments specified). To convert a set of joined lines to a single spline, first convert them to a polygon and then convert the polygon to a spline.
Tip: The Action menu can also be accessed directly on the screen: select an object or objects and right-click or ⌃-left-click (control-left-click).