If you hold down the ⌥ (Option) key while clicking the "Length, area and center" menu item it will also tell you if the polygon is "Closed" or "Not closed". While this is pretty obvious for the simple polygons shown here, it is not at all obvious for a polygon with a very large number of small sides.
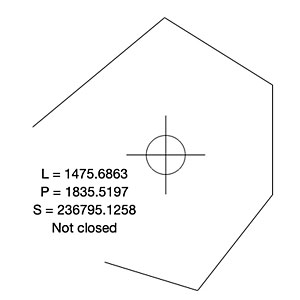
For an open polygon like that shown on the right, it will calculate the following data. In this example, lengths are in mm and the area is in mm2.
L: Gives the length of all the sides combined .
P: Gives the length of the periphery. For an open polygon like this, the periphery is calculated assuming it is closed with an imaginary line joining the two open end points
S: Gives the area of the polygon. For an open polygon like this, the area is calculated assuming it is closed with an imaginary line joining the two open end points.
The centre of area is indicated.
Finally it is telling you that the polygon is Not closed
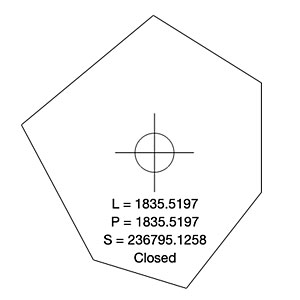
For a closed polygon like that shown on the right, it will calculate the following data. Again, in this example, lengths are in mm and the area is in mm2.
L: Gives the length of all the sides combined.
P: Gives the length of the periphery, which for a closed polygon will be the same as the length.
S: Gives the area of the polygon.
The centre of area is indicated.
Finally it is telling you that the polygon is Closed
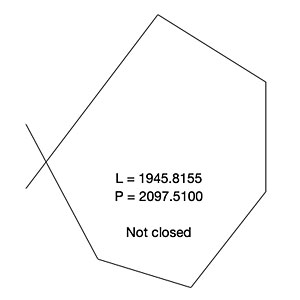
For a crossed polygon like that shown on the right, it will calculate only the following data. Again, in this example, lengths are in mm.
L: Gives the length of all the sides combined.
P: Gives the length of the periphery, which will include the imaginary line joining the two open ends.
S: No area is calculated.
The centre of area is not calculated.
Finally it is telling you that the polygon is Not closed
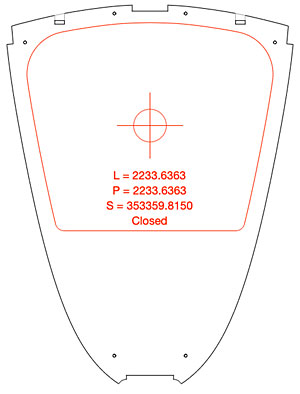
The image on the right is a frame drawing from a sailboat design. The outline in the middle (which is in fact the inside line of the frame), shown in red, is a complex polygon with somewhere over 250 sides making up the "curved" line.
The length and area data are shown together with the centre of area as described above. And the polygon is shown as "Closed", which means there are no gaps or crossed lines.
With the example shown, the frame is of constant thickness. So the center of area is also the centre of gravity (CoG). And the weight is the area multiplied by the thickness multiplied by the density. With this frame, to find the weight of the frame, we can take the outer shape and find its center and area and then deduct the area of the inside aperture (the polygon shown in red in the image). To calculate the vertical CoG of the frame we can use moment of the distances of the two centres from a common zero point and their weights, which is a classic "see-saw" calculation.
Tip: If you don't get an area (S) or a center of area with a complex polygon, it usually means that two of the lines making it up are overlapping or crossed – and you will get the "Not closed" message. You will still get a length (L) and periphery (P). This is a very useful check if you are supplying CNC cutting files – which must usually be complete, with no crossed lines etc., in order to cut correctly. The crossed lines can be really small, possibly just overlapping, and hard to find but at least you know it is there and can be searched for at a high zoom %.<
Tip: Again, with a complex polygon if you get an area (S) and a centre of area, OK but the length (L) is different from the periphery (P) and a "Not closed message" then you know there is a gap somewhere in your polygon. This is also usually undesirable with files for CNC cutting. As with crossed or overlapping lines, the gap can be really tiny and hard to find but at least you know it is there and can be searched for at a high zoom %.
As with many functions in RealCADD, the center of area calculations are contributing to the engineering of a project as well as simply drawing components.
Apply attributes (keyboard shortcut ⌥⌘A) applies the attributes (as shown in the Attributes pallet) of a selected object to a previously selected object or objects.
To apply attributes, select the object that you want to transfer attributes to. Then, holding the shift key down, select the object that you want to transfer attributes from. Hit ⌥⌘A. The first object will take on the attributes of the second object you selected.
To apply attributes to more than one object, select all the objects that you want to transfer the attributes to (holding the shift key down as usual). Then, still holding the shift key down, select the object that you want to transfer the attributes from. Hit ⌥⌘A. The first object and subsequent objects will take on the attributes of the object you selected finally.
All the attributes in the Attributes pallet will be transferred. If the object is text, then the attributes in the Text pallet will also be transferred.
Tip: The Action menu can also be accessed directly on the screen: select an object or objects and right-click or ⌃-left-click (control-left-click).