Left: (keyboard shortcut ⇧←) All the selected objects will be aligned so that their left-most point is aligned to the left-most point of the left-hand object.
Hor. center: All the selected objects will move horizontally so that their centres are aligned vertically.
Tip: If you want the objects to align to the centre of a specific object, then lock that object before you do the align.
Right: (keyboard shortcut ⇧→) All the selected objects will be aligned so that their right-most point is aligned to the right-most point of the right-hand object.
Top: (keyboard shortcut ⇧↑) All the selected objects will be aligned so that their top-most point is aligned to the top-most point of the top object.
Vert. center: All the selected objects will move vertically so that their centres are aligned horizontally.
Tip: If you want the objects to align to the centre of a specific object, then lock that object before you do the align.
Bottom: (keyboard shortcut ⇧↓) All the selected objects will be aligned so that their bottom-most point is aligned to the bottom-most point of the bottom object.
Left: The selected objects will be distributed equally between the outer pair so that their left-most points are equidistant. The outer pair (the left and right objects) won't move.
Hor. center: The selected objects will move horizontally so that their centres are aligned equidistantly vertically. The outer pair (the left and right objects) won't move.
Right: The selected objects will be distributed equally between the outer pair so that their right-most points are equidistant. The outer pair (the left and right objects) won't move.
Top: The selected objects will be distributed equally between the outer pair so that their top-most points are equidistant. The outer pair (the top and bottom objects) won't move.
Vert. center: The selected objects will move vertically so that their centres are aligned equidistantly horizontally. The outer pair (the top and bottom objects) won't move.
Bottom: The selected objects will be distributed equally between the outer pair so that their bottom points are equidistant. The outer pair (the top and bottom objects) won't move.
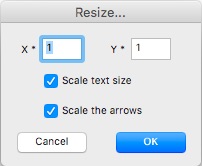 Resize... (keyboard shortcut ⌥⌘E) does exactly what it says: it changes the size of an object or group of objects. It does not change the scale they are drawn at – it simply makes them bigger or smaller.
To resize an object enter multipliers in the X* and Y* boxes.
Numbers larger than 1 make the object bigger; numbers smaller than 1 make it smaller.
By default initially when you enter a number in the X* box, the number in the Y* box will change automatically to be the same – so to change the size of an object proportionally (the same in both x- and y-directions), you just need to enter the resize amoiunt in the X* box.
For example, if you enter 2 in the X* box, you will double the size of the object in the x and y direction. If you enter 0.5 in both boxes you will halve the size. If you enter 2 in the X* box and 0.5 in the Y* box, you will make the object twice as big in the x-direction and half the size in the y-direction.
Just to reiterate the scale question: let's say you have a 100mm diameter circle, drawn at 1/10 scale. You resize it by 2 in both the x-direction and y-direction. You will have a 200mm diameter circle, still at 1/10 scale. It won't be a 100mm diameter circle at 1/5 scale, unless you change its scale in the Edit pallet – which is not the best way to go about it.
Tip: To change the scale of your 1/10 circle to 1/5 but still keep it at 100mm (scale) diameter, create another layer on your drawing at 1/5 scale. Then copy the circle and paste it on to the 1/5 layer. RealCADD will ask you of you wish to "Scale the object from 1/10 to 1/5". Answer "Yes" and your circle will be pasted at 1/5 scale. See Edit >> Pasting and Scale.
Scale text size. Checking this box resizes any text that is contained in a group of objects. So if you resize by two a group of objects that contains 9 point text, you will get 18 point text. Leaving the box unchecked, keeps the text at its original size regardless of how much the other objects in a group are resized.
Scale the arrows. Checking this box resizes any arrows that are contained in a group of objects. Leaving the box unchecked, keeps all arrows at their original size regardless of how much the other objects in a group are resized.
Tip: The Action menu can also be accessed directly on the screen: select an object or objects and right-click or ⌃-left-click (control-left-click).