 Arrows...
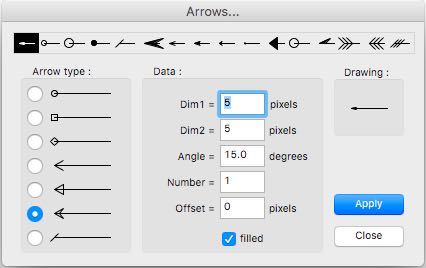
This is where you edit and specify the sizes of the various arrows that are available in the Window >> Attributes pallet.
The current menu of arrows is displayed along the top of the pallet. Seven arrow types are available:
Square or rectangle
Diamond
Open arrow
Triangle
Classic arrow
Line
The Data section controls the shape of the arrows, whether they are filled or not, and how many repeats of the arrows there are. The information varies a little depending on the arrow type.
Circle or oval: The first two boxes read Radius X and radius Y and control the x and y radii of the arrowhead. If they are the same the arrow will be a circle; if they are different it will be an oval. Angle is not used and is dimmed out. Number controls how many arrowheads there will be (default is 1). Offset controls how far apart multiple arrowheads will be (default is 0). The "filled" checkbox controls whether the arrowhead is filled or not.
Square or rectangle: The first two boxes read Dim X and Dim Y and control the x and y dimensions of the arrowhead. If they are the same the arrow will be a square; if they are different it will be a rectangle. Angle is not used and is dimmed out. Number controls how many arrowheads there will be (default is 1). Offset controls how far apart multiple arrowheads will be (default is 0). The "filled" checkbox controls whether the arrowhead is filled or not.
Diamond: The first two boxes read Dim X and Dim Y and control the x and y dimensions of the arrowhead. If they are the same the diamond will be a square; if they are different it will be a rectangular. Angle is not used and is dimmed out. Number controls how many arrowheads there will be (default is 1). Offset controls how far apart multiple arrowheads will be (default is 0). The "filled" checkbox controls whether the arrowhead is filled or not.
Open arrow: The first two boxes read Dim 1 and Dim 2 and control the lengths of the two arms of the arrowhead. Angle controls the angle each arm makes to the line. If the angle is positive, then Dim 1 is the top arm and Dim 2 is the bottom arm; if the angle is negative Dim 1 is the bottom arm and Dim 2 is the top arm. Angles greater than 90º will produce a backwards-facing arrow. Number controls how many arrowheads there will be (default is 1). Offset controls how far apart multiple arrowheads will be (default is 0). The "filled" checkbox controls whether the arrowhead is filled or not. The arrowhead fills from the tip of one arm to the tip of the other, so in fact it appears the same as the Triangle when filled.
Triangle: The first two boxes read Dim 1 and Dim 2 and control the lengths of the two arms of the arrowhead. Angle controls the angle each arm makes to the line. If the angle is positive, then Dim 1 is the top arm and Dim 2 is the bottom arm; if the angle is negative Dim 1 is the bottom arm and Dim 2 is the top arm. Angles greater than 90º will produce a backwards-facing arrow. Number controls how many arrowheads there will be (default is 1). Offset controls how far apart multiple arrowheads will be (default is 0). The "filled" checkbox controls whether the arrowhead is filled or not.
Classic arrow: The first two boxes read Dim 1 and Dim 2 and control the lengths of the two major arms of the arrowhead. Angle controls the angle each major arm makes to the line. If the angle is positive, then Dim 1 is the top arm and Dim 2 is the bottom arm; if the angle is negative Dim 1 is the bottom arm and Dim 2 is the top arm. Angles greater than 90º will produce a backwards-facing arrow. The inner arms adjust automatically to the angles and dimensions chosen (and can produce some odd/interesting results with different sized arms and different angles). Number controls how many arrowheads there will be (default is 1). Offset controls how far apart multiple arrowheads will be (default is 0). The "filled" checkbox controls whether the arrowhead is filled or not.
Line: The first two boxes read Dim 1 and Dim 2 and control the lengths of the two arms of the arrowhead. Angle controls the angle each arm makes to the line. If the angle is positive, then Dim 1 is the top arm and Dim 2 is the bottom arm; if the angle is negative Dim 1 is the bottom arm and Dim 2 is the top arm. Angles greater than 90º will produce a backwards-facing arrow. Number controls how many arrowheads there will be (default is 1). Offset controls how far apart multiple arrowheads will be (default is 0). The "filled" checkbox is not used and is dimmed out.
To edit an arrow, select the one you wish to edit in the top row of current arrows. Then implement the changes that you wish to make – these can be either just some of the data, keeping the arrow type the same; or both the type and the data can be changed.
The "Drawing" box shows the effect of the changes. Once you are happy with the new arrow style click the "Apply" button and then "Close". Your new arrow will be available program-wide.
 Dashes...
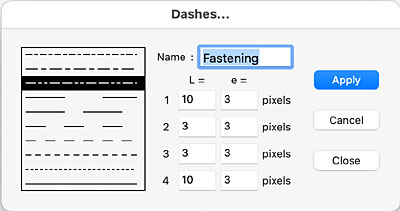
This is where you edit and specify the sizes and arrangements of the dashed lines that are available in the Windows >> Attributes pallet. Ten preset lines are available. Up to four dashes and four spaces can be programmed.
L= is the length of the dash.
e = is the gap between the dashes.
Name: You can give each line a specific name.
The pane to the right shows how I have a long-dash/short-dash line set up, named "Fastening":
L1 is the length of the first dash – 10 pixels.
e1 is the gap between the first dash and the second – 3 pixels.
L2 is the length of the second dash – 3 pixels.
e2 is the gap between the second dash and the third – 3 pixels.
L3 is the length of the third dash – 3 pixels.
e3 is the gap between the third dash and the fourth – 3 pixels.
L4 is the length of the fourth dash – 10 pixels.
e4 is the gap between the fourth dash and the whole thing repeating – 3 pixels.
You don't have to use all the L's and e's – just set the ones you don't want to zero.
To make a dashed line where all the dashes are equal, set L1 and e1 to the lengths you want and then set the rest to zero to zero.
Tip: For a dotted line set L1 to 1 pixel and e1 to 2 pixels; set the rest to zero.
Tip: As with arrows, you may find that you need to have dashes for scales in the 1/30 to 1/10 range and different dashes for, say, 1/1.
Once you are done, click the Apply button and then Close.