 Page setup
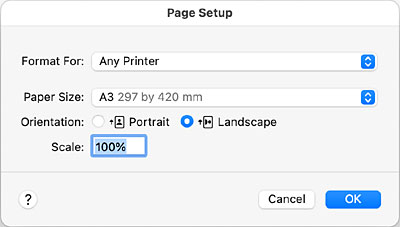
This brings up a standard Page Setup window. Normally in RealCADD (Plan format) your Drawing Size will be the same as your Page Size as most CAD drawings don't want to be spread over several pages, where page margins will interrupt the drawing.
Format For: Choose which printer you wish to use from your available system printers. Or choose Any Printer, which let you use paper sizes larger than your printer can handle.
Paper Size: Choose the paper size you wish to use. Unless you choose Any Printer in the Format menu above, paper sizes that your printer can't handle will be greyed out. The image shows A3 paper selected.
If you scroll to the bottom of the paper size drop-down menu you will find "Manage Custom Sizes" where you can add extra paper sizes, even if your printer(s) can't handle them. This is useful if you are issuing your drawings online for others to print. So, for example, you could specify a Paper Size of A1, even though you don't have a wide format printer or plotter. Scroll to the end of this page to see more detail about managing custom sizes.
Orientation: Choose from Portrait (long side vertical) or Landscape (long side horizontal).
 Scale: Normally leave this at 100%. It can however be useful if you want to print a larger drawing on smaller paper. For example if you have made a drawing at A3 size but you want to print it out at A4 size, setting the Scale at 67% will fit the drawing to A4 paper. This works better with international paper sizes (A-series, B-series) which are in a constant proportion, than it does with American paper sizes, which mostly are not.
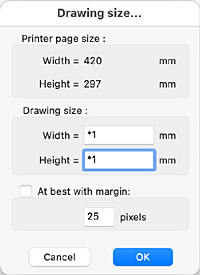
When you hit the OK button, the Drawing Size pane comes up. You will see that this shows the Printer page size as Width = 420mm and Height = 297mm, which is what we set up on the Page Setup window – i.e. A3, Landscape. Note that this is a full size A3 page with no printer margins – see Manage Custom Sizes below.
Drawing size: You can set the size of your drawing in two ways:
Relative to the Printer Page Size. Rather than specifying an absolute size, you can make set your drawing size by a multiplier of the printer page size. Here we have set Width = *1 and Height = *1 – that is, the same size as the printer page size. You can use any multiplier you wish, using the asterisk as the multiplier sign.
Tip: The advantage of using a multiplier rather than an absolute size is that the drawing size will always be that multiplier of the Page Setup. So, for example, if you change your Page Setup from Portrait to Landscape, your drawing size will automatically change. The same is true if you change the paper size – say from A4 to A3 – your drawing size will automatically change to suit the new Page Setup.
Tip: I often set my initial drawings size to Width = *1.25, Height = *1 as this gives me a bit of extra space on the right hand side of the drawing for the Tool pallets to sit, without obscuring the objects on the drawing. Once the drawing is done, I set the width back to *1.
Absolute Size. Enter the actual size you want your drawing to be. So for a single A3 landscape page enter Width = 420 and Height = 297. This produces exactly the same result as entering Width = *1, Height = *1. You can enter any number you wish; for example, entering Width = 840, Height = 297, would produce a drawing two A3 pages wide and one A3 page high.
At best with margin: Checking this box overrides the Drawing Size entry and, instead sets a drawing size the specified number of pixels outside all the objects visible on the drawing. So at the default 25 pixel setting, the drawing size will be set to have a 25 pixels margin around the outermost drawn objects. Quite logically, objects on non-visible layers will not be included.
This brings the standard Print window, where you can set your specific printer options, page layout, media etc. This is also the place to Export a RealCADD drawing to a PDF document. At the bottom left of the Print window there is a PDF drop-down menu; the menu items may vary depending on your system. Generally, choose "Save as PDF" or "Save as Adobe PDF". This will take you to a further window where you can name your PDF file, choose where to save it, etc.
Manage Custom Sizes
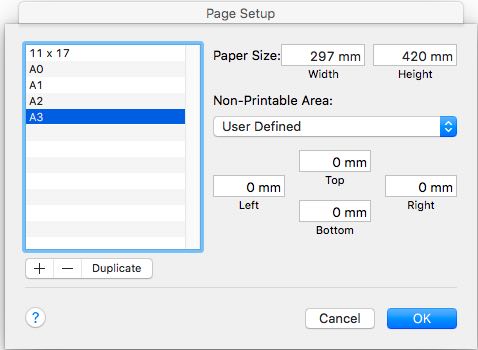 In Page Setup, click the Paper Size drop-down menu, scroll to the bottom and select Manage Custom Sizes. This will bring up the window to the right.
To add a new custom size click the + sign bottom left. This will add a new Untitled paper size to the list. Click once on Untitled and wait until the name is editable; name it as you wish.
Edit the Paper Size Width and Height boxes to reflect the size of your new custom size.
In the Non-Printable Area drop-down menu, select your printer, if you are setting a size it can print; or select User Defined if you are setting a size you can't print (but want to use).
Set the four margins. I usually set them to 0.00, so that I get a full size page. Then I draw the border around my drawing a certain distance in from the page edges. But you can set them to any number you want.
To delete a paper size, select it and hit the – sign bottom left.
To duplicate a paper size, select the size you want to duplicate and hit the "Duplicate" button. This is maybe useful if you want the same paper size, but with different margins, for example.
When you are done, hit the OK button.
Drawing outside the page. From RealCADD version 5, you can draw objects outside the page. You can scroll to them and zoom on them. But, not unreasonably, you can't print them (unless of course you change the page size, or number of pages, to include them). And if you export the drawing (via "Save as") only the objects within the page will be exported.