 The Preferences menu sets the basic behaviour and functionality of RealCADD.
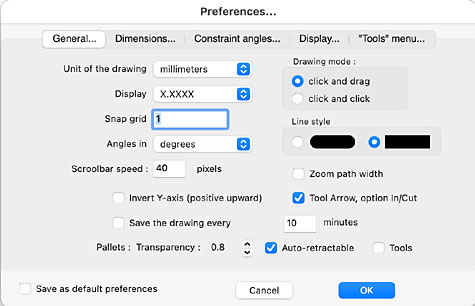
We'll deal first with the General pane, which appears initially when you click Preferences. Use the links top right to go to the other Preferences panes.
Tip: Preferences are saved with each drawing, and different drawings can have different preferences; so when you open a drawing again, the specific preferences for that drawing will still be as you set them.
Units. This sets the units that you are going to draw in. Select from the drop-down menu.
Metric: Choose from kilometres, metres, centimetres and millimetres.
Pixels: Mostly used for drawings for screen use.
Customary US units: Choose from decimal feet, decimal inches, fractional feet and inches and fractional inches.
Display. This sets the precision to which the dimensions are displayed in the Edit pallet. It doesn't affect the accuracy of the drawing, nor does it affect dimensioning. The options will vary according to which units you have selected. Select from the drop-down menu.
Metric: From a whole number (X) up to six decimal places (X.XXXXXX). The last number will be rounded as usual: ≥.5 rounds up; <.5 rounds down.
Pixels: From a whole number (X) up to six decimal places (X.XXXXXX). The last number will be rounded.
Customary US units: With decimal feet and decimal inches, choose from a whole number (X) up to six decimal places (X.XXXXXX). The last number will be rounded. With fractional feet and inches or fractional inches, the selection runs from ½" to 1⁄512".
Snap grid. If Grid is selected in the Snap (Attractions) pallet, this controls how close you need to be to a grid intersection for a drawn object to snap to it.
Tip: Regardless of any grid setting, Snap grid also sets the initial value of the "Nudge" box – see Getting Started >> On-screen Menus. As shown for example, an object will be nudged 1mm for each arrow click.
Angles. Select radians, degrees or grades from the drop-down menu to set the unit of angle displayed in the Edit pallet. The selection here doesn't affect dimensioning.
Scrollbar speed. This controls how fast the drawing scrolls when using the wheel or rollerball on your mouse. The standard mode is vertical scrolling. For horizontal scrolling, hold down the shift key. The default value is 60. Smaller numbers = slower; bigger numbers = faster.
Tip: Holding down the Option key causes the mouse wheel or rollerball to zoom in and out, rather than scroll.
Invert Y-axis. By default Positive Y is down and Negative Y is up. Checking this box reverses this, so Positive Y is up and Negative Y is down.
Save the drawing every. Checking this will bring up a reminder to save your drawing. The time between reminders is set in the "minutes" box. It doesn't mean that your drawing will be saved automatically. It will quite logically only issue a reminder if the drawing has been changed since the last save.
Tip: Auto-save reminder can be toggled on and off in individual drawings using the On-screen Menus
Pallets. This controls the behaviour of the various pallets when they are selected under the Windows menu.
Transparency as its name suggests controls how transparent the pallets are. The default is 0.8 (80% solid). Use the little up-down arrow box to change. The maximum is 1 = not transparent at all. The minimum is 0.1 = almost wholly transparent. The pallets revert to not-transparent when you mouse over them. While you can see objects under the pallets (if transparency is set), you can't select or work with the part of the object that is under them.
Auto-retractable controls the behaviour of four pallets – Edit, Attributes, Text and Snap. If checked, the pallets will close when not in use, leaving just the pallet title bar visible. They will automatically expand whenever an object is selected, that they contain information about. So if you select a line for example, the Edit and Attributes pallets will expand to show the information about that line. The Snap pallet expands when you mouse over it.
Tools controls the behaviour of the Tools pallet. If checked, just the first column of the Tool pallet will be visible and the pallet will expand to its full extent as you mouse over it. If unchecked, the full Tools pallet will always be displayed.
Drawing mode controls the drawing method.
Click and drag is the Mac standard. To draw a line (or other object), position the mouse where you want it to start; hold down the (left) mouse button and, keeping it held down, drag to where you want it to finish, and let go.
Click and click With click and click, you click once where you want the object to start, move the mouse to where you want it to finish and click again.
Tip: Holding down the Shift key will cause a line to be drawn to the nearest angle set by the Constraint pane of Preferences (often 90º, 45º and 30º). Holding down the Shift key will also cause a rectangle to be drawn as a square and an oval as a circle.

 Line style allows you select to draw lines with rounded ends or square ends. The selection is drawing-wide – that is if you change it, it will change all the applicable objects in the drawing. This only becomes relevant if you draw using fairly thick lines, in which case lines with rounded ends will look better when joined – as you can see right. Rectangles, squares and polygons will also have rounded corners, if "Round" is selected. However, unlike joined lines, they will also look fine if "Square" is selected.
Tip: If you draw a polygon (open or closed) with "Square" selected and then Convert to Lines (⌥⌘L) it will revert to square ends and won't look good. Conversely if you have two "Square" lines joined (as the first of the two illustrations right) and select to Convert to Polygon (⌥⌘P) it will look fine. Experiment to see what suits you best!
Zoom path width. RealCADD is basically a WYSIWYG (What You See Is What You Get) program. So if you draw a line (say) 2 pixels wide, it stays at 2 pixels when you zoom (magnify) the drawing, so at big magnifications it starts to look quite wide, because you are magnifying the pixels. Leaving this box unchecked means that the path width won't look bigger as you zoom, which won't be true WYSIWYG, but may well be more satisfactory. So, if you want everything to look the same regardless of how much zoom (magnification) you apply, then leave this box unchecked.
Tip: If your lines look thicker than you thought they would be when you print, leave this box unchecked.
Tool Arrow, option In/Cut.. If this box is checked, drawing a marquee from Left to Right with the Select tool will only select objects wholly within the marquee; drawing the marquee from Right to Left will select all objects that the marquee passes through, as well as those contained within it. If the box is unchecked, drawing a marquee in either direction will only select objects wholly contained with the marquee.
Save as default preferences. This does exactly what you'd expect: it saves your Preferences as the default. These will apply to any new drawing opened, but will not change the Preferences of previously saved drawings. Leave this unchecked if you are just setting Preferences for a single drawing and don't want them to apply to future drawings.