Duplicate is the simplest, single keystroke, way to copy an object if you subsequently want to move it, work on it etc., in the same drawing and on the same layer. If you want to duplicate an object and place it elsewhere, then use Copy and Paste.
Tip: You can duplicate any number of selected objects, groups and other constructs. Each will be placed on top of its original. If you do copy multiple objects, the copies will all be "active" so, before clicking the mouse, you can group them (if they are on the same layer), change their colour, drag them elsewhere, etc. You can duplicate objects on different visible layers (provided the "Selection on all visible layers" box is checked in the Layers/Pages... pallet). The duplicated objects will be duplicated on to the layers their originals are on.
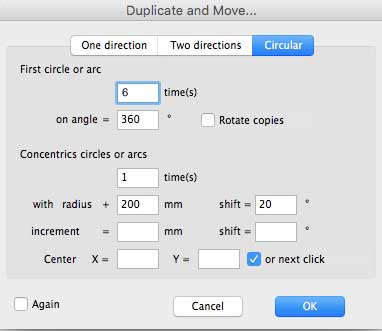
Duplicate and Move... is fairly complex and consists of three panes:One direction. Two directions. Circular.

Circular duplicates and moves the duplicated objects in a circular fashion around a given point.
First circle or arc.
Times. Enter the number of duplicates you want.
On angle =. Enter the total included angle you wish to rotate the duplicates.
Rotate copies. Checking this box will cause each duplicate itself to rotate as well as the general rotation
Center. This specifies the rotation centre:
"X=" and "Y=". The rotation will occur about the specified x and y coordinates as soon as you hit the OK button.
"or next click" The rotation will occur about the next mouse click after you have hit the OK button. You can use "Snap" to have a rotation about a precise point.
Here's a couple of examples to show the difference between rotating the copies and not rotating them, and under what circumstance you might rotate or not rotate.
Rotate copies not checked:
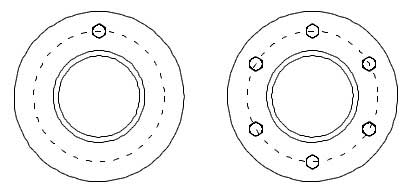
Six bolts around an engineering flange.
Starting with the flange on the left – a typical flange – with one bolt on the Pitch Circle Diameter (PCD). The object is to have six in total, spread equally around the flange, all on the PCD.
If you enter 6 in the "times" box and 360º in the "on angle" box, this will give us six copies, so the last one will be on top of the original (and can simply be deleted). Or enter 5 in the "times" box and 300º (360º ÷ 6 = 60º; 60º x 5 = 300º) in the "on angle" box.
Where it's hard to figure the angle – say with seven bolts through 360º – just enter 7 and 360º and delete the last duplicate.
Check "on next click" and hit the OK button.
Using the "Center" snap, move the mouse over the flange until it picks up the center of the PCD and click the mouse. The result is the flange on the right, with all six bolts nicely arranged equally around the PCD.
Rotate copies checked:
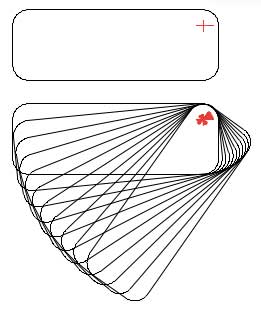
A hinged object dropping through a given angle.
The top drawing is a simplified version of a yacht centreboard – checking to see how it tracks. The board will pivot on the red cross. It will drop 55º, so that in the "down" position its leading edge is at 35º (the least angle that will generally stay clear of weed, plastic and other flotsam.)
Enter 10 in the "times" box and -55º (for counter-clockwise rotation) in the "on angle" box. The actual number of rotated copies is not important – the aim is get a view of how the board tracks. Check the Rotate copies box.
Check "on next click" and hit the OK button.
Using the "Intersection" snap, move the mouse over centreboard until it picks up the intersection of the two red lines and click the mouse. The result as the bottom drawing, which nicely shows the track of the centreboard on its way down.
Note that because we specified 10 copies, each copy rotates by 1/10th of the total angle, so 55º ÷ 10 = 5.5º.
This is a simple example of using RealCADD not only to produce a final drawing but also to check the engineering geometry on the way.
Concentric circles or arcs.
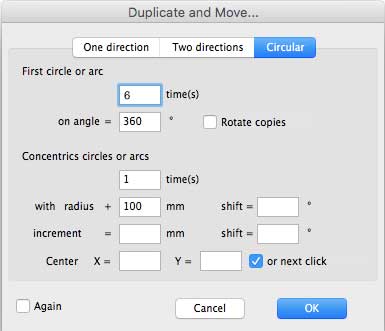
This is supplemental to "First circle or arc", so there needs to be data there for it to function.
The image to the right shows data entry to firstly draw 6 duplicates, rotating them through 360º (as we did in the flange example above). And to do this once, displacing them by 100mm from the original object, in the "Concentric circles or arcs" section we have entered 1 in the "times" box and 100 in the "with radius +" box. The "on next click" box is checked.
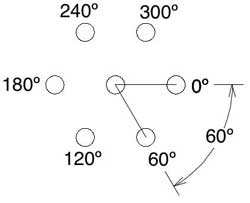
The little drawing to the right shows the result. The circle in the middle is the original object. "Center" snap was used to pick up the centre of the circle.
I have annotated the drawing to show the direction the duplicates flow in - which is clockwise for positive angles – each duplicate being 100mm out from the original circle and rotated 60º.
If for example we had entered 2 in the Concentric circles or arcs "times" box, we would have got a second set of 6 duplicate circles a further 100mm out. 3 would produce three concentric circles, each one 100mm further out than the previous one, and so on.
One minor glitch is that we now have 6 extra original circles piled up on top of each other – it's best to delete those.
Now let's add something in the "shift =" box – a 20º shift. We are working on the same drawing, so we already have the first ring of duplicates 100mm out. We will place our second set of duplicates 200mm out.
Again the little drawing to the right shows the result.
The new duplicates are shown in red and annotated in red. They lie on a 200mm radius circle, and they are shifted 20º in the clockwise direction.
As before, we have a pile of six circles on top of the original which are best deleted.
Increment starts to get nearly as complicated as quantum mechanics – but essentially it works in a similar way to increment in the other two circular functions, though it can get a little hard to figure out exactly what is going to happen.
Again. Checking this box works in a similar way to the other two functions in that it brings up the same pane again, with the same settings.
Tip: The Action menu can also be accessed directly on the screen: select an object or objects and right-click or ⌃-left-click (control-left-click).